Beyond Heroku: Owning Your Deployments
When you launch a new app, convenience rules. Platforms like Heroku offer a beautifully simple way to push code and see it live in minutes. You don’t need to think about servers, networks or databases. You just deploy. That’s why so many of us start there.
But convenience has a cost. As your product grows, you want more control over performance and security. You want to integrate your own services, tune the infrastructure and optimize your spend. Heroku’s dyno‑based pricing, which starts around $25/month for a modest dyno and climbs to hundreds of dollars for high‑performance dynos, can become prohibitive for serious production workloads. And while Heroku abstracts away the underlying cloud, that abstraction also means you can’t fine‑tune the way your application runs.
This trade‑off eventually becomes untenable. Teams need the simplicity of a platform like Heroku and the power and trust of running inside their own AWS account. This post unpacks why migrating off Heroku matters, highlights the friction points when you try to move to AWS yourself, and shows how the Defang CLI bridges the gap.
Heroku vs. AWS
Heroku is a Platform‑as‑a‑Service very focused on simplicity and ease of use, while AWS offers a huge array of extremely powerful services that can be difficult to navigate alone. What you get from Heroku is the ability to deploy your application with a simple git push, scale by adding dynos and pick from a marketplace of add‑ons. But you miss out on much of the power of AWS, like the ability to organize and network services the way you want, the ability to deploy in a huge number of regions, their reliability, and much of the control you need to be called enterprise-ready. AWS also tends to be more cost effective as you scale and offers a wide variety of scalable storage options including Postgres, MongoDB, Redis, and more.
Pricing and scale
Heroku’s pricing is tied to dynos. Eco dynos cost about $5/month for 1,000 hours, while standard dynos run $25–$50/month and performance dynos jump to $250–$1,500/month. Those numbers are predictable, but if your traffic spikes or you need more compute, your dyno bill scales quickly. Databases and Redis add‑ons are also billed per gigabyte, adding to the total cost.
AWS uses a pay‑as‑you‑go model: you pay for the exact resources you use, whether on‑demand compute, reserved instances or spot capacity. This model can be far cheaper at scale, especially if you commit to reserved or savings plans, but it also introduces complexity. Besides compute, you need to factor in elastic IPs, data transfer, load balancers and NAT gateways. AWS rewards expertise: you can optimize costs but only if you understand its pricing levers.
Why leave Heroku?
For many teams, Heroku is the right starting point. But there are clear inflection points when it makes sense to graduate:
-
Escalating costs. As your user base grows, dyno bills rise exponentially. At some point, the predictable price premium no longer justifies the convenience.
-
Performance and scalability demands. High‑traffic applications need flexible scaling and the ability to choose instance sizes and storage types. Heroku’s dyno types can be limiting for CPU‑ or memory‑intensive workloads.
-
Compliance and data sovereignty. Customers in regulated industries often require apps to run in their own cloud account and under their own compliance controls.
-
Customization. You might need to integrate bespoke networking, private databases or other services not available as Heroku add‑ons. AWS’s vast ecosystem of more than 240 services makes these integrations possible.
Yet the path off Heroku isn’t trivial. Re‑platforming often means rewriting your application to use AWS services directly, building new CI/CD pipelines, managing IAM roles and provisioning infrastructure by hand. That’s a big lift for developers who just want to ship features.
Migration in minutes: how the Defang CLI works
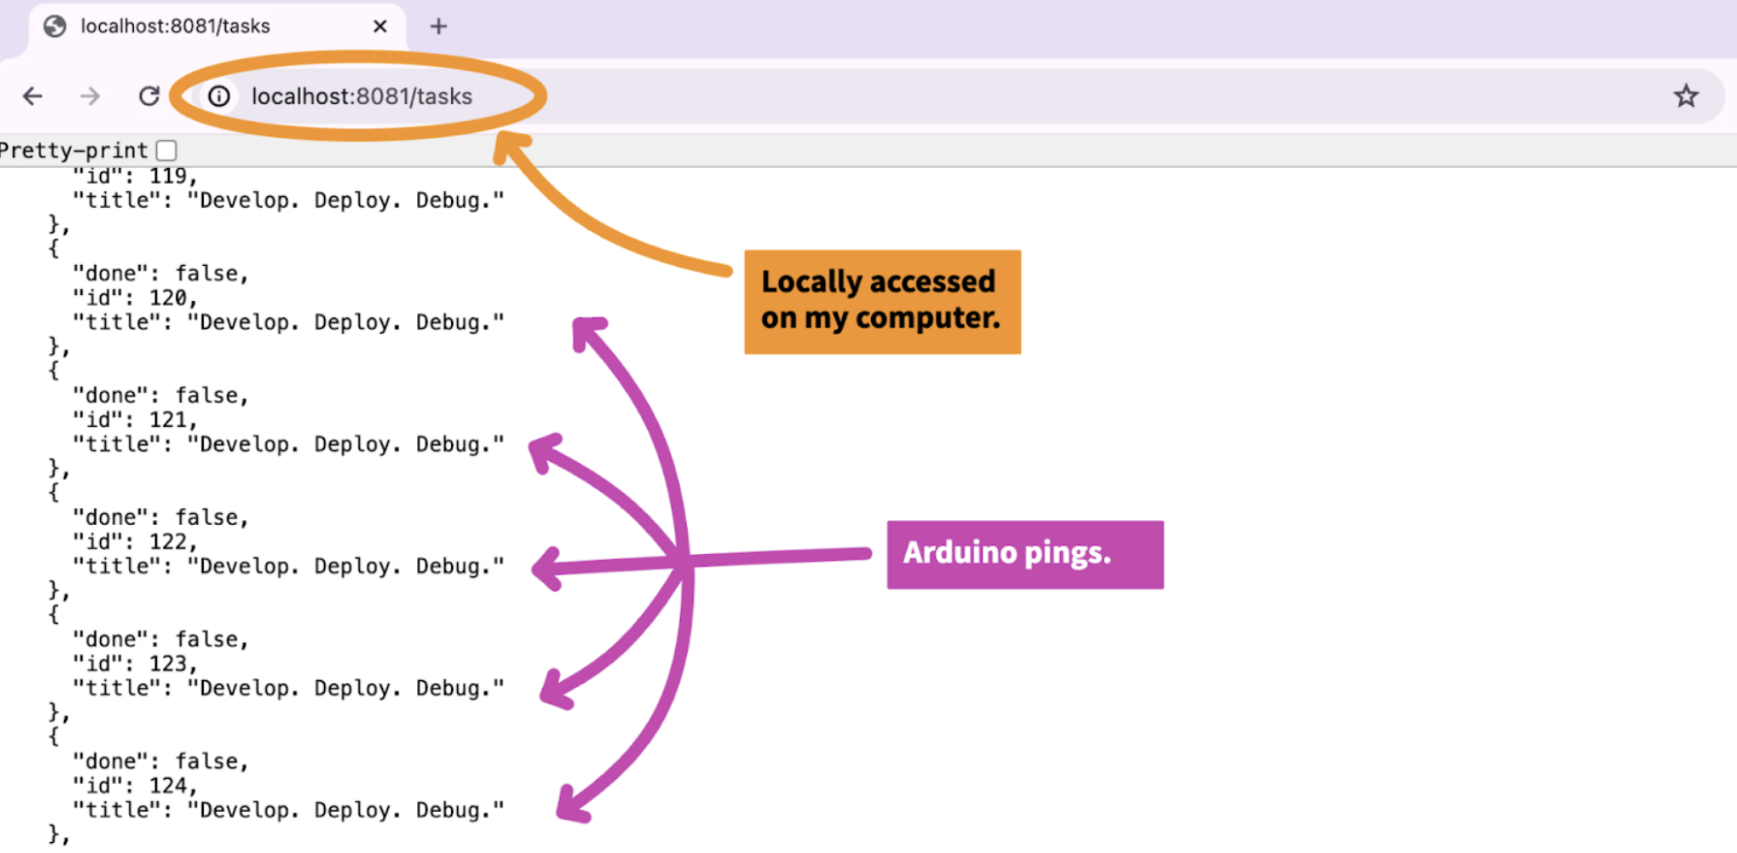
In our recent video (“How to migrate from Heroku to AWS in 5 minutes!”), we demonstrated a Django + Postgres app running on Heroku. The goal: deploy it into our own AWS account without rewriting anything. Here’s how it works:
Import your Heroku app. After installing and logging into the Defang CLI, run:
defang init
Then select Migrate from Heroku.
Defang connects to the Heroku API, inspects your app’s dynos, add‑ons and configuration variables, and generates a Docker Compose file. It translates Procfile commands into services and records dependencies like Postgres and Redis.
Review the Compose file. You should always examine the generated compose.yaml. You can adjust ports or remove unnecessary services. In the demo we changed the exposed port to 8000 and confirmed everything looked reasonable.
Select your cloud.
We authenticated against AWS and selected a profile (AWS_PROFILE=defang-lab). In Defang, you set a provider with an environment variable DEFANG_PROVIDER=aws.
You can either export these, or pass them to each command:
AWS_PROFILE=defang-lab DEFANG_PROVIDER=aws defang <command>
Or you can set them as environment variables:
export AWS_PROFILE=defang-lab DEFANG_PROVIDER=aws
Set your secrets.
You then run defang config set to provide any secrets (database user, password, database name) that were previously stored in Heroku. These secrets are encrypted at rest and passed securely to your services deployment.
Deploy with one command. Finally, execute:
defang up
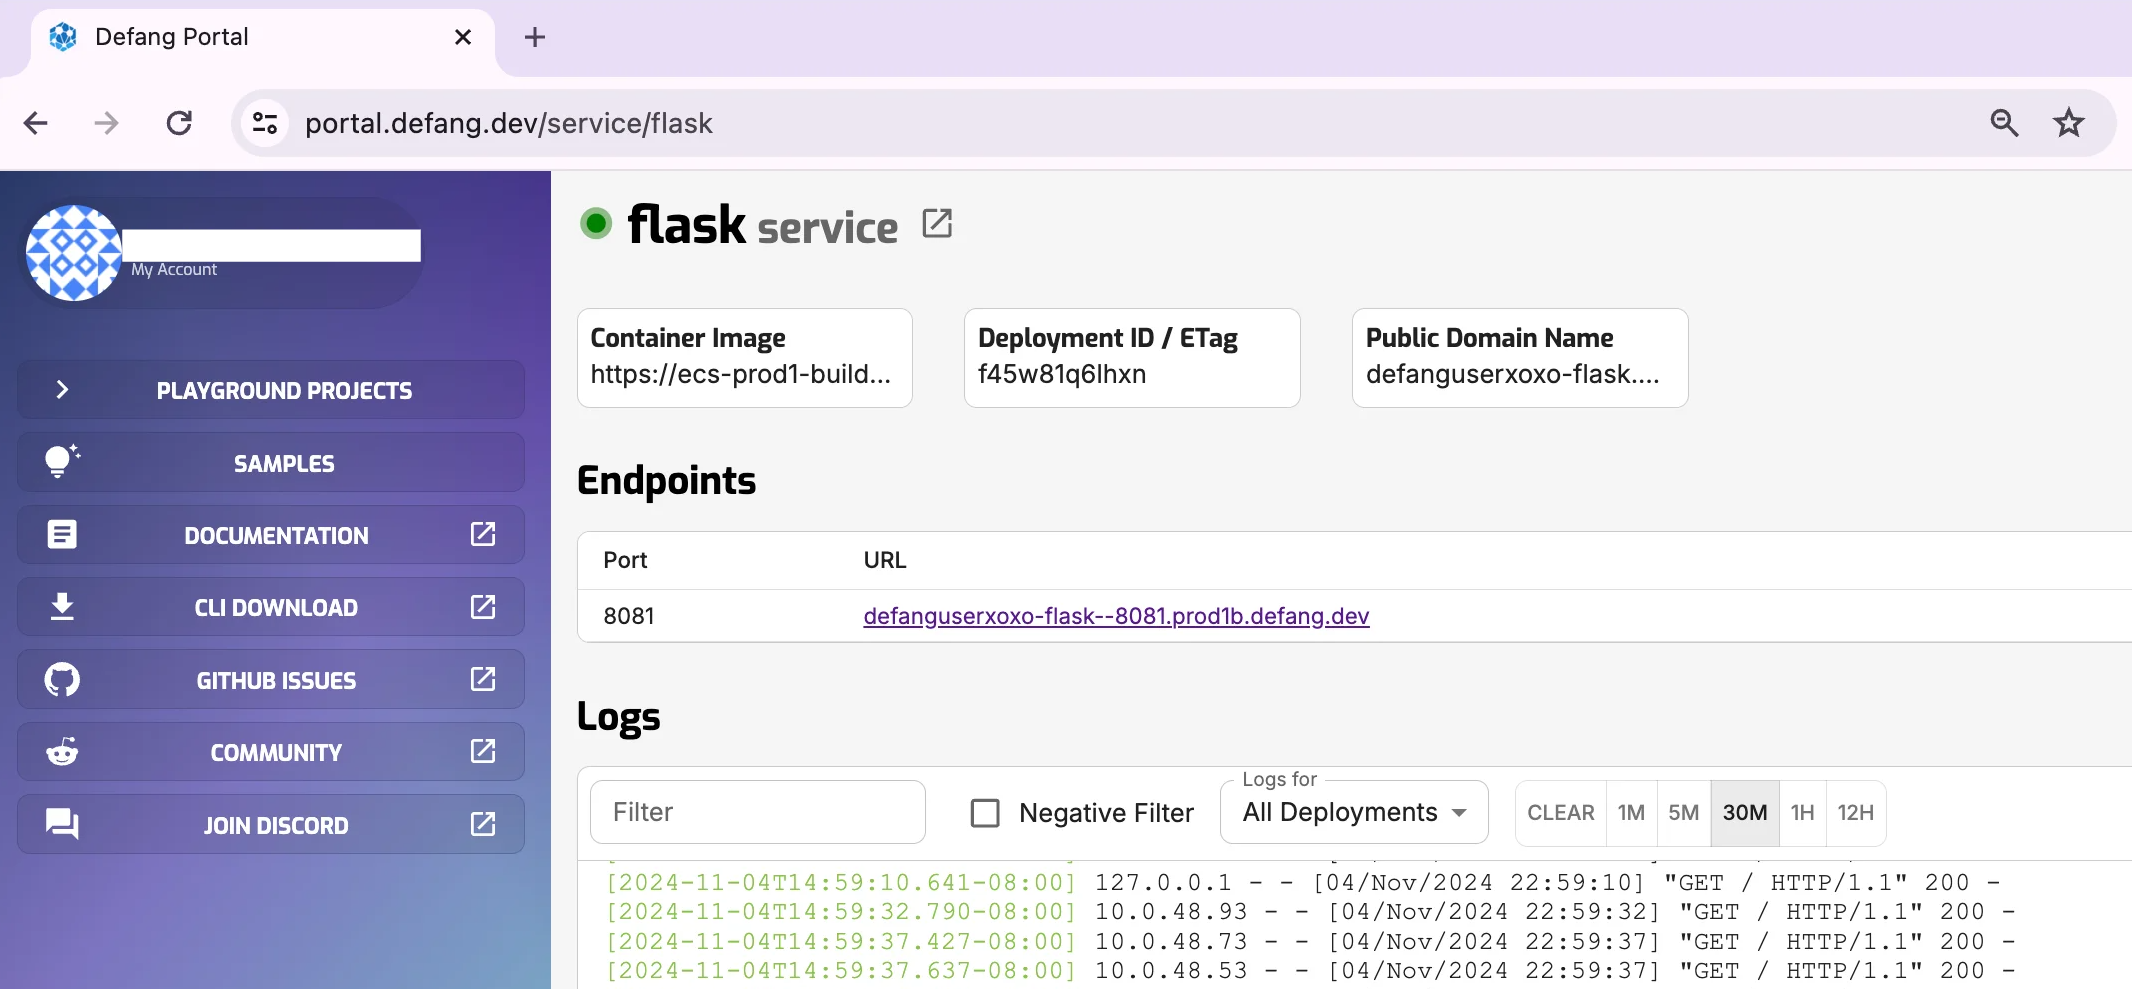
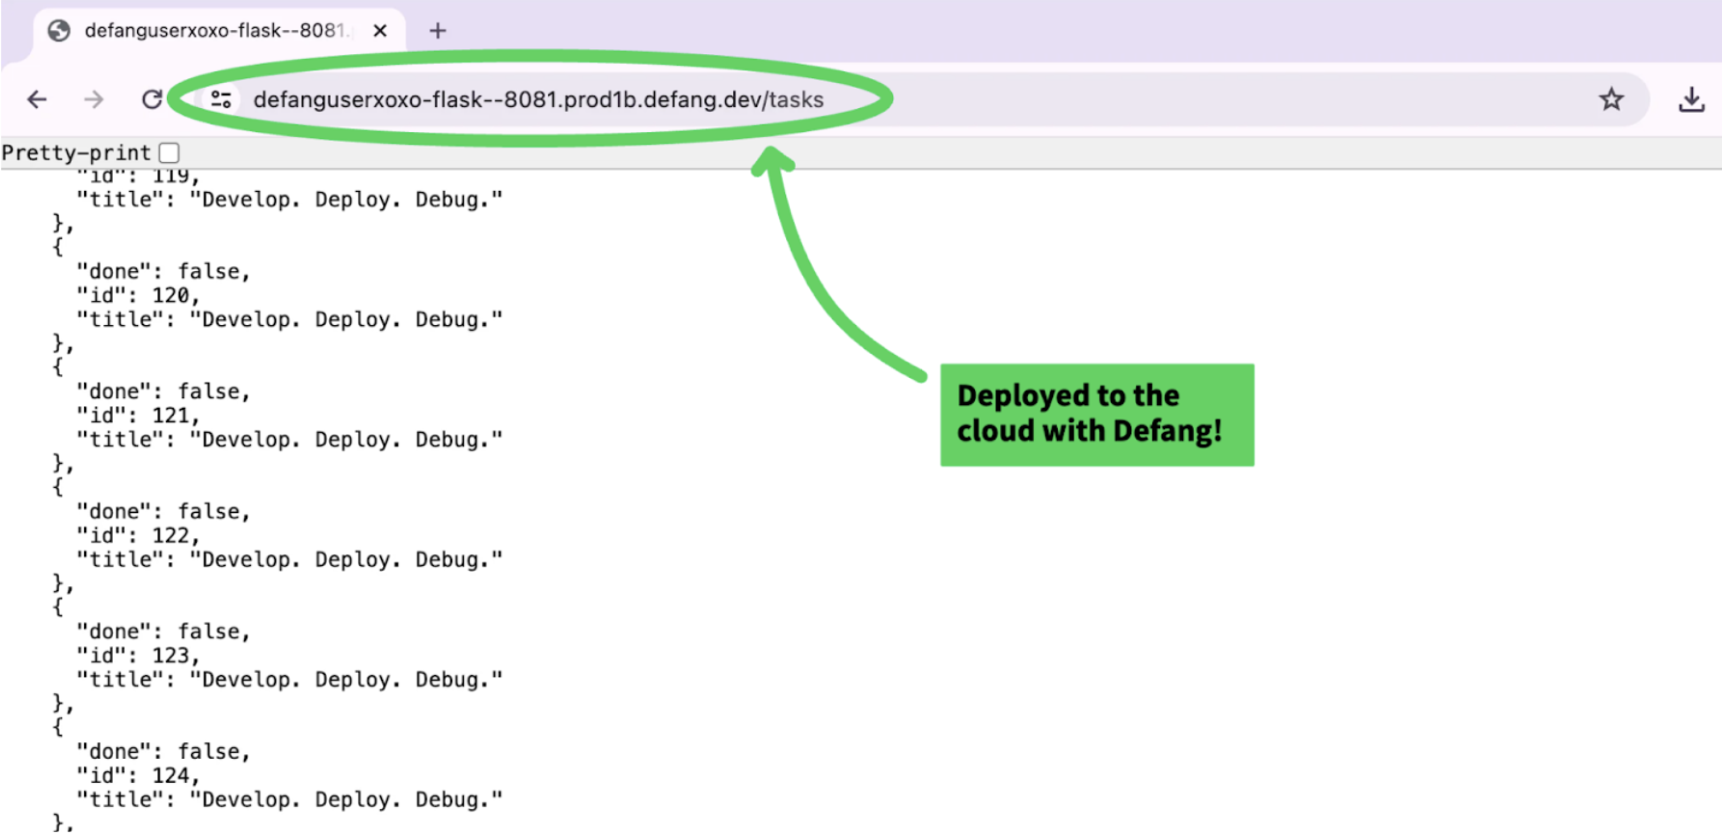
Defang provisions an ECS cluster, RDS database, VPC, security groups, DNS records, load balancer, and more for your application. It also provisions a release service to handle migrations and brings up your web service once the database is ready. Eventually you get a public URL for your working application.
Verify and scale.
The entire migration took roughly five minutes from start to finish, with zero changes to application code. Instead of rewriting our Django settings or learning the intricacies of ECS, we let Defang automate the heavy lifting.
Why this matters
The migration from Heroku to AWS delivers two critical advantages that matter most to growing teams: cost savings and power and flexibility.
As we covered earlier, Heroku's dyno pricing can quickly escalate from $25/month to hundreds or even thousands as you scale. AWS's pay-as-you-go model, combined with reserved instances and spot capacity, can reduce your infrastructure costs by 60-80% at scale (depends on your use case). You pay only for what you use, when you use it.
More importantly, you gain access to AWS's full ecosystem of 240+ services. Need a specific instance type for CPU-intensive workloads? Custom networking for multi-region deployments? Advanced monitoring and logging? On Heroku, you're limited to what's available in their add-on marketplace. On AWS, you can integrate any service, tune performance at the infrastructure level, and architect solutions that simply aren't possible on a PaaS.
For some teams, there's also the benefit of deploying into customer cloud accounts for compliance and data sovereignty requirements.
Defang bridges this gap by giving you Heroku-like simplicity with AWS power.
Try it yourself
If your team is outgrowing Heroku or you need to bring your application into your customers’ cloud, give our migration workflow a spin. Install the Defang CLI, run defang init migrate-from-heroku, and watch your app come to life in AWS. You can find more details in our official migration guide. We’d love to hear what you deploy and what features you’d like us to add next.